


Basic Group operations are very simple. Groups are deeply integrated with the Soracom User Console, ensuring that creating a Group and managing its options is easy to access. While Groups can be accessed from several parts of the User Console, the following examples show basic usage from the Soracom Air for Cellular screens.
Managing Groups
Creating a Group
-
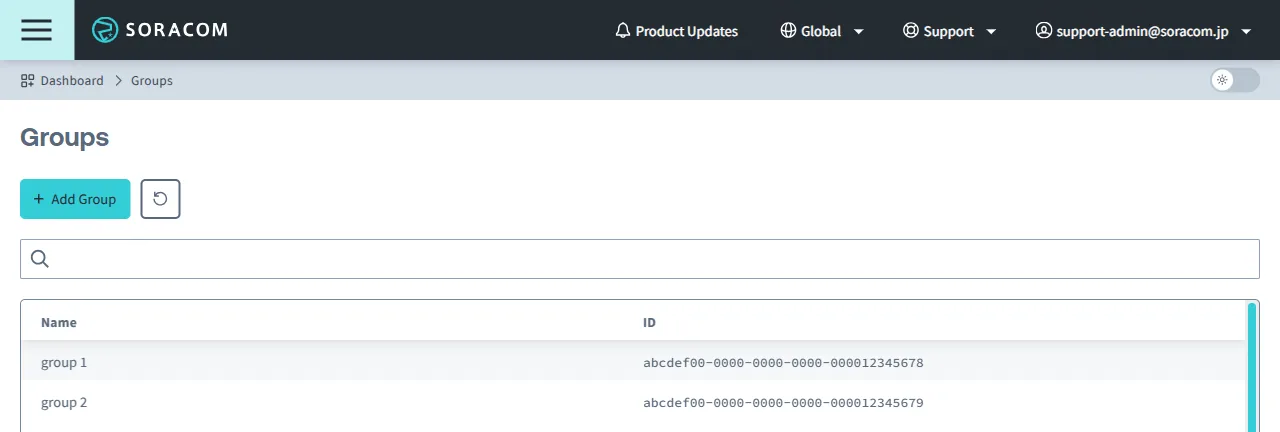
Sign in to the User Console . From the Menu, open the Groups screen.
-
Click the + Add Group button.
-
Enter a name for your group, then click Create.
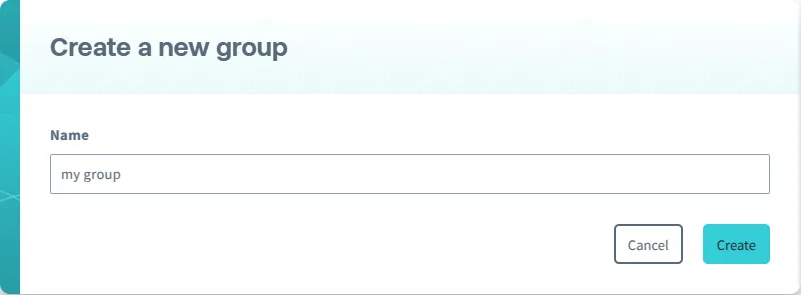
When you create a new group, it will automatically be assigned an ID. This ID is required when performing actions to the group using the Soracom API or Soracom CLI.
You can also create a group when registering a new IoT SIM, or when adding a device to a group.
Copying a Group
You can copy an existing group to quickly create a new group with the same configuration. Watch Options are not carried over to the copied group.
-
Sign in to the User Console . From the Menu, open the Groups screen.
-
From the list of groups, click the Name of the group you want to copy to open its settings page.
-
Click the Copy this group button.
The copied group will be created with the same configuration as the original group. The new group's name will be the original group name with copy appended to it.
The Soracom API and Soracom CLI do not provide a direct method to copy a group. To copy a group, retrieve the configuration of an existing group and create a new group with that configuration.
- When using the Soracom API, use the getGroup or listGroups API to retrieve the configuration of an existing group, then use the createGroup API to create a new group.
- When using the Soracom CLI, use
soracom groups getorsoracom groups listto retrieve the configuration of an existing group, then usesoracom groups createto create a new group.
Renaming a Group
-
Sign in to the User Console . From the Menu, open the Groups screen.
-
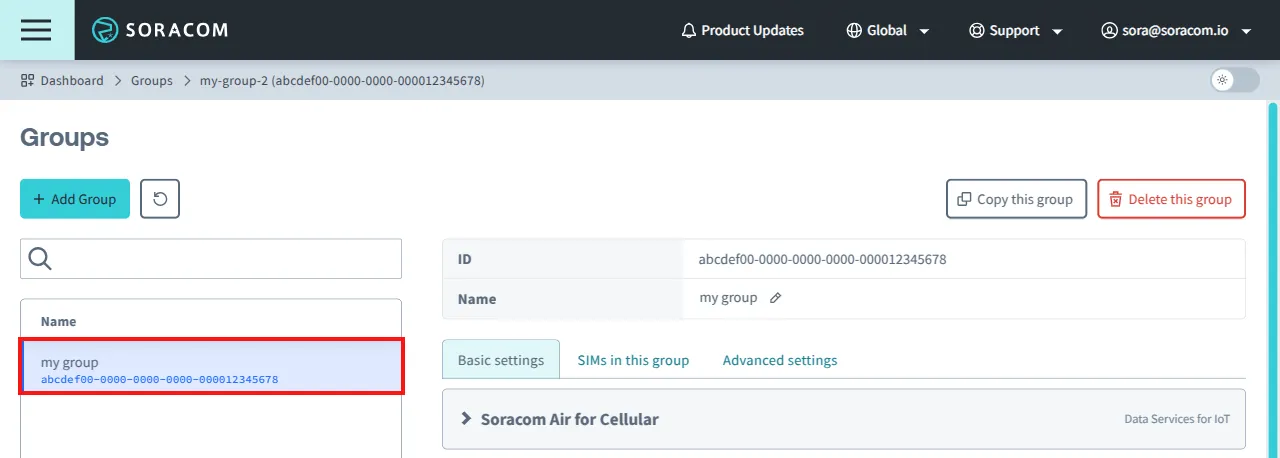
From the list of groups, click the Name of the group you want to rename to open its settings page.
-
From the group settings page, click the icon next to the current group name.
-
Enter the new name for your group, then click the to save.
Deleting a Group
A group can only be deleted if there are no devices attached to the group. If your group contains any devices, remove them from the group first.
-
Sign in to the User Console . From the Menu, open the Groups screen.
-
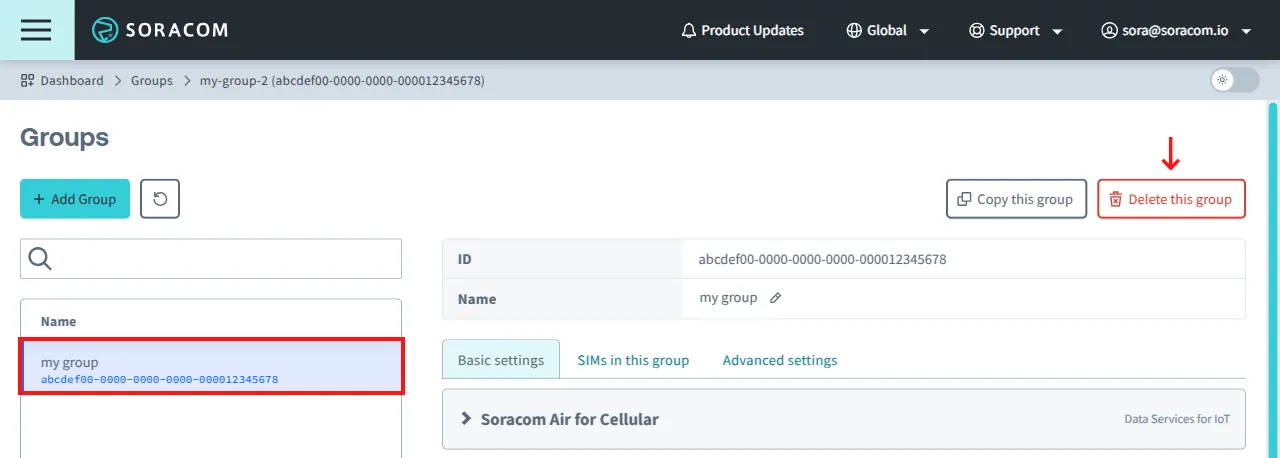
From the list of groups, click the Name of the group you want to delete to open its settings page, then click the Delete this group button.
-
A warning will appear asking you to confirm deletion. Click Delete to delete the group.
Managing Devices
The following instructions are for Air for Cellular devices, but also apply to Air for Sigfox, Air for LoRaWAN, and Soracom Inventory devices. Simply open the Sigfox Devices, LoRa Devices, or Device Management screens respectively.
Adding a Device to a Group
-
Sign in to the User Console . From the Menu, open the SIM Management screen.
-
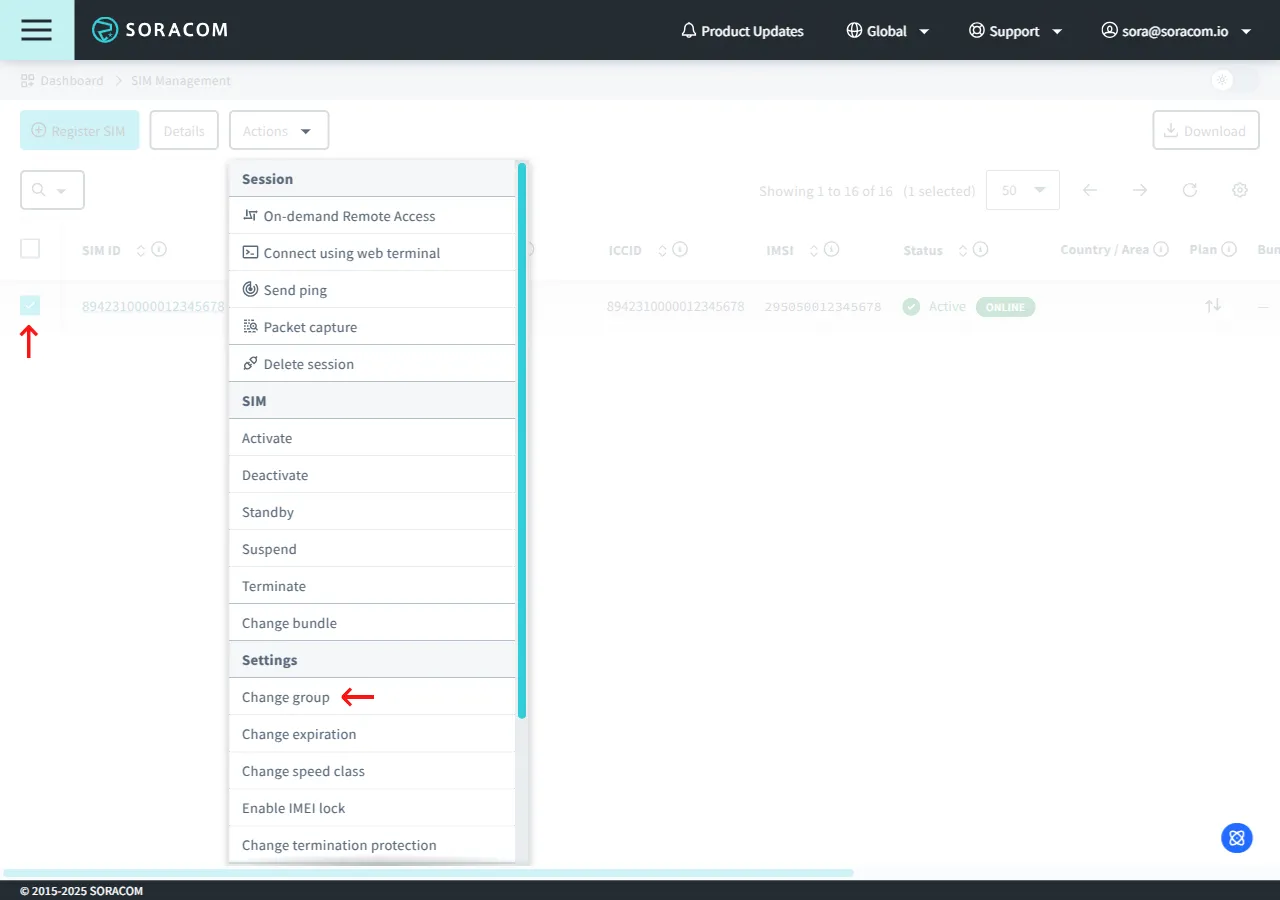
From the list of subscribers, click the for the SIM you want to modify.
-
Click the Actions menu, then select Change group.
-
From the Update selected subscribers group dialog, select the group you want to set for the IoT SIM device, then click Change Group.
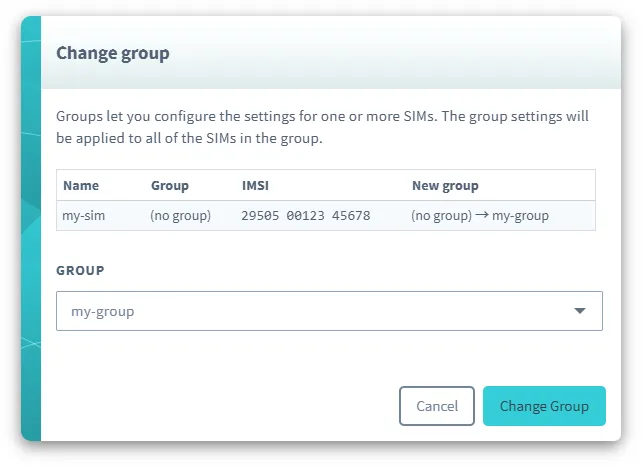
You can also create a new group by selecting the Create group... option.
Removing a Device from a Group
-
Sign in to the User Console . From the Menu, open the SIM Management screen.
-
From the list of subscribers, click the for the SIM you want to modify.
-
Click the Actions menu, then select Change group.
-
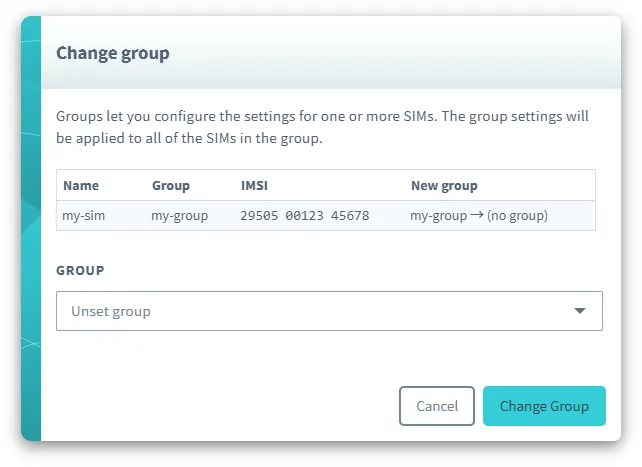
From the Update selected subscribers group dialog, select Unset group, then click Change Group.
Programmatic Usage
You can manage Groups programmatically using the Soracom API or Soracom CLI.
In addition to create, rename, delete, add, and remove actions, the API and CLI provides the ability to list subscribers in each group, as well as configure various group parameters. Refer to the API reference or CLI documentation for further information.
[block=api]
Soracom API
To access the Soracom API, first use the auth API to obtain an API Key and Token. Refer to the API Usage Guide for instructions on how to use the API Key and Token in API requests.
Then, use the createGroup API to create a group:
[ui-tabs theme=code] [ui-tab title=Global]
curl -X POST \
|  -H 'X-Soracom-API-Key: <MY-API-KEY>' \
|  -H 'X-Soracom-Token: <MY-TOKEN>' \
|  -H 'Content-Type: application/json' \
|  -d '{
|        "tags": {
|          "name": "my-group"
|        }
|      }' \
|  https://g.api.soracom.io/v1/groups
[/ui-tab] [ui-tab title=Japan]
curl -X POST \
|  -H 'X-Soracom-API-Key: <MY-API-KEY>' \
|  -H 'X-Soracom-Token: <MY-TOKEN>' \
|  -H 'Content-Type: application/json' \
|  -d '{
|        "tags": {
|          "name": "my-group"
|        }
|      }' \
|  https://jp.api.soracom.io/v1/groups
[/ui-tab] [/ui-tabs]
Once the group is created, the API will return a response which includes the group ID. You can then use this ID for additional group-related APIs.
A group's name is stored in the name attribute of its tags. To rename a group, simply update its tags using the putGroupTags API:
[ui-tabs theme=code] [ui-tab title=Global]
curl -X PUT \
|  -H 'X-Soracom-API-Key: <MY-API-KEY>' \
|  -H 'X-Soracom-Token: <MY-TOKEN>' \
|  -H 'Content-Type: application/json' \
|  -d '[
|        {
|          "tagName": "name",
|          "tagValue": "my-new-group"
|        }
|      ]' \
|  https://g.api.soracom.io/v1/groups/<GROUP-ID>/tags
[/ui-tab] [ui-tab title=Japan]
curl -X PUT \
|  -H 'X-Soracom-API-Key: <MY-API-KEY>' \
|  -H 'X-Soracom-Token: <MY-TOKEN>' \
|  -H 'Content-Type: application/json' \
|  -d '[
|        {
|          "tagName": "name",
|          "tagValue": "my-new-group"
|        }
|      ]' \
|  https://jp.api.soracom.io/v1/groups/<GROUP-ID>/tags
[/ui-tab] [/ui-tabs]
To delete the group, use the deleteGroup API:
[ui-tabs theme=code] [ui-tab title=Global]
curl -X DELETE \
|  -H 'X-Soracom-API-Key: <MY-API-KEY>' \
|  -H 'X-Soracom-Token: <MY-TOKEN>' \
|  https://g.api.soracom.io/v1/groups/<GROUP-ID>
[/ui-tab] [ui-tab title=Japan]
curl -X DELETE \
|  -H 'X-Soracom-API-Key: <MY-API-KEY>' \
|  -H 'X-Soracom-Token: <MY-TOKEN>' \
|  https://jp.api.soracom.io/v1/groups/<GROUP-ID>
[/ui-tab] [/ui-tabs]
To add an IoT SIM to a group, use the setSimGroup API:
[ui-tabs theme=code] [ui-tab title=Global]
curl -X POST \
|  -H 'X-Soracom-API-Key: <MY-API-KEY>' \
|  -H 'X-Soracom-Token: <MY-TOKEN>' \
|  -H 'Content-Type: application/json' \
|  -d '{
|        "groupId": "<GROUP-ID>"
|      }' \
|  https://g.api.soracom.io/v1/sims/<SIM-ID>/set_group
[/ui-tab] [ui-tab title=Japan]
curl -X POST \
|  -H 'X-Soracom-API-Key: <MY-API-KEY>' \
|  -H 'X-Soracom-Token: <MY-TOKEN>' \
|  -H 'Content-Type: application/json' \
|  -d '{
|        "groupId": "<GROUP-ID>"
|      }' \
|  https://jp.api.soracom.io/v1/sims/<SIM-ID>/set_group
[/ui-tab] [/ui-tabs]
And to remove it from a group, use the unsetSimGroup API:
[ui-tabs theme=code] [ui-tab title=Global]
curl -X POST \
|  -H 'X-Soracom-API-Key: <MY-API-KEY>' \
|  -H 'X-Soracom-Token: <MY-TOKEN>' \
|  https://g.api.soracom.io/v1/sims/<SIM-ID>/unset_group
[/ui-tab] [ui-tab title=Japan]
curl -X POST \
|  -H 'X-Soracom-API-Key: <MY-API-KEY>' \
|  -H 'X-Soracom-Token: <MY-TOKEN>' \
|  https://jp.api.soracom.io/v1/sims/<SIM-ID>/unset_group
[/ui-tab] [/ui-tabs]
Groups for Sigfox, LoRaWAN, and Soracom Inventory devices are managed similarly using the following API methods:
- setSigfoxDeviceGroup and unsetSigfoxDeviceGroup
- setLoraDeviceGroup and unsetLoraDeviceGroup
- setDeviceGroup and unsetDeviceGroup [/block]
[block=cli]
Soracom CLI
To use the Soracom CLI, you must first configure it to authenticate with your account information, authorization key, or SAM user credentials.
Then, use the groups create command to create a group:
[ui-tabs theme=code] [ui-tab title=Global]
soracom groups create --body '{ "tags": { "name": "my-group" } }' --coverage-type g[/ui-tab] [ui-tab title=Japan]
soracom groups create --body '{ "tags": { "name": "my-group" } }' --coverage-type jp[/ui-tab] [/ui-tabs]
Once the group is created, the CLI will return a response which includes the group ID. You can then use this ID for additional group-related commands.
Similar to the API example above, we can update a group's tags with the groups put-tags command in order to rename it:
[ui-tabs theme=code] [ui-tab title=Global]
soracom groups put-tags --group-id '<GROUP-ID>' --body '[ { "tagName": "name", "tagValue": "my-new-group" } ]' --coverage-type g[/ui-tab] [ui-tab title=Japan]
soracom groups put-tags --group-id '<GROUP-ID>' --body '[ { "tagName": "name", "tagValue": "my-new-group" } ]' --coverage-type jp[/ui-tab] [/ui-tabs]
To delete the group, use the groups delete command:
[ui-tabs theme=code] [ui-tab title=Global]
soracom groups delete --group-id '<GROUP-ID>' --coverage-type g[/ui-tab] [ui-tab title=Japan]
soracom groups delete --group-id '<GROUP-ID>' --coverage-type jp[/ui-tab] [/ui-tabs]
To add an IoT SIM to a group, use the sims set-group command:
[ui-tabs theme=code] [ui-tab title=Global]
soracom sims set-group --sim-id <SIM-ID> --group-id '<GROUP-ID>' --coverage-type g[/ui-tab] [ui-tab title=Japan]
soracom sims set-group --sim-id <SIM-ID> --group-id '<GROUP-ID>' --coverage-type jp[/ui-tab] [/ui-tabs]
And to remove it from a group, use the sims unset-group command:
[ui-tabs theme=code] [ui-tab title=Global]
soracom sims unset-group --sim-id <SIM-ID> --coverage-type g[/ui-tab] [ui-tab title=Japan]
soracom sims unset-group --sim-id <SIM-ID> --coverage-type jp[/ui-tab] [/ui-tabs]
Groups for Sigfox, LoRaWAN, and Soracom Inventory devices are managed similarly using the following commands:
soracom sigfox-devices set-groupandsoracom sigfox-devices unset-groupsoracom lora-devices set-groupandsoracom lora-devices unset-groupsoracom devices set-groupandsoracom devices unset-group[/block]
[block=metadata]
Metadata Service
The Metadata Service allows an Air SIM device to access and configure its own settings without the need for authentication. For more information, refer to the Metadata Service documentation.
When the Metadata Service is enabled, an Air for Cellular device can set or unset its own group configuration.
Use the Subscriber setGroup API to assign the IoT SIM to a group:
curl -X POST \
|  -H 'Content-Type: application/json' \
|  -d '{
|        "groupId": "<GROUP-ID>"
|      }' \
|  http://metadata.soracom.io/v1/subscriber/set_group
And to remove it from a group, use the Subscriber unsetGroup API:
curl -X POST \
|  http://metadata.soracom.io/v1/subscriber/unset_group
When changing an IoT SIM's group assignment, not all options will take effect immediately. Your device may need to disconnect from the network and reconnect in order to load settings from a new group assignment. [/block]