


Introduction
In this guide, we create an Amazon Data Firehose instance and an S3 bucket on AWS CloudFormation, then use the Soracom Funnel Amazon Data Firehose adapter to send data directly from your device to an S3 bucket.
We will be using Soracom Funnel along with the following AWS resources:
Click the links to read about these services in more depth.
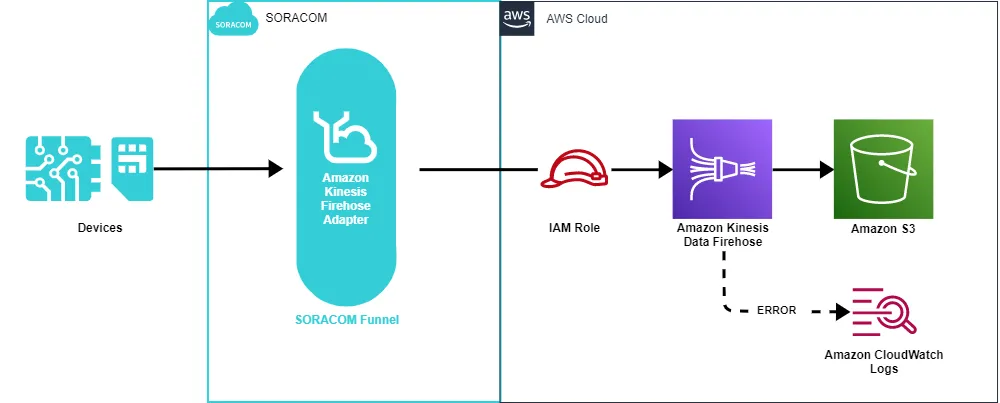
Data Flow
- The Data sent from your devices will be received by Soracom Funnel.
- Funnel uses IAM Role authentication to send your data over to Amazon Data Firehose.
- Amazon Data Firehose relays the data to S3.
- When the data transfer to S3 fails, the error log is recorded on Amazon CloudWatch Logs, which will be available for 14 days after the error occurs.
Funnel uses TLS 1.2. Ensure that you configure your cloud service to support TLS 1.2.
Step 1: Set up AWS Resources
You will first use AWS CloudFormation to configure and prepare all the AWS Resources used on this guide.
Prepare AWS Resources Using CloudFormation
- Click here to Use the AWS CloudFormation Template.
This template will default to the Tokyo Region. Change your region and use the template URL if you are using a different region.
https://soracom-files.s3.amazonaws.com/cfn-samples/SoracomAwsCfnSampleFirehoseToS3Stack.yml
For details on this template, refer to AWS CloudFormation Resource Stack Details in the References section below.
-
Configure the settings below:
Parameter Content CoverageAWSAccountID This parameter depends on your IoT SIM's coverage: - JP Coverage:
762707677580 - Global Coverage:
950858143650
DeliveryStreamName Enter any stream name IamRoleExternalIdForFunnel Enter any external id, then save it somewhere since it will be used later
(e.g. external-id-0123456789)IamRoleNameForFunnel Enter any IAM Role name S3BucketName Enter any S3 Bucket name - JP Coverage:
3. Click the check box next to I acknowledge that AWS CloudFormation..., then click Create stack
You have successfully set up AWS Resources.
Retrieve IAM Role ARN
- Navigate to AWS IAM Roles
- Search for and click the IAM Role you just created (enter the IAM Role Name you entered when you created the CloudFormation Resource Stack)
- Copy the Role ARN and save it for later
At this point you should have an External ID and a Role ARN saved somewhere.
Step 2: Configure Soracom Funnel
Now that you have the AWS Resources set up, you will set up and enable Soracom Funnel.
Register Your AWS IAM Role Credentials
- Sign in to your Soracom console , then click the top right corner
- Click Security
- Click the Credentials tab, then click the Register credentials button
- Enter your IAM credentials as follows, then click Register:
| Parameter | Content ||--------------------|----------------------------------------------------------------------------------|
| **Credential set ID** | Any name for this credential set (i.e. AWS-IAM-Role-Soracom-Funnel-s3) |
| **Type** | AWS IAM Role |
| **Role ARN** | Role ARN of the IAM Role you created in Step 1 |
| **External ID** | Your IAM Role's external id from Step 1 |For a more detailed guide on this section, go to Creating a Credential Set, while still using the specifications above.
Enable Soracom Funnel
- Add all desired SIMs to a group, then click SORACOM Funnel.
Setting up Soracom Funnel is done at the group level. For more information on Groups and how to add your IoT SIMs to a group, check the Groups section in the User-Console Guide.
-
Turn Soracom Funnel on by clicking the switch
-
Configure all the below settings for Funnel
| Parameter | Content ||--------------|----------------------------------|
| **Service** | Amazon Data Firehose |
| **Destination** | https://firehose.<Your Region code\>.amazonaws.com/<DeliveryStreamName\> (e.g. https://firehose.ap-northeast-1.amazonaws.com/funnel-delivery-stream)|
| **Credentials** | The credentials you just created |
| **Content Type** | JSON |
<br>
4. Click Save
You have successfully set up and activated Soracom Funnel.
Step 3: Send Data to Soracom Funnel
Now that you have all the set up done, send a request to Funnel's entry point. We have provided the following examples for connecting with TCP, UDP, and HTTP.
[ui-tabs theme=code] [ui-tab title=TCP]
nc funnel.soracom.io 23080
|{"temperature":20} [Enter]
>200
|[Ctrl+C]
[/ui-tab]
[ui-tab title=UDP]
nc -u funnel.soracom.io 23080
|{"temperature":20} [Enter]
>200
|[Ctrl+C]
[/ui-tab]
[ui-tab title=HTTP]
curl -vX POST http://funnel.soracom.io \
|  -d '{
|        "temperature": 20
|      }' \
|  -H "Content-Type: application/json"
>
>* Note: Unnecessary use of -X or --request, POST is already inferred.
>*   Trying 100.127.65.43:80...
>* Connected to funnel.soracom.io (100.127.65.43) port 80 (#0)
>> POST / HTTP/1.1
>> Host: funnel.soracom.io
>> User-Agent: curl/7.74.0
>> Accept: */*
>> Content-Type:application/json
>> Content-Length: 18
>>
>* upload completely sent off: 18 out of 18 bytes
>< HTTP/1.1 204 No Content
>< Date: Fri, 28 Oct 2022 12:54:03 GMT
>< Connection: keep-alive
>< Keep-Alive: timeout=5
><
>* Connection #0 to host funnel.soracom.io left intact
[/ui-tab] [/ui-tabs]
Step 4: Confirm Your Data in S3
Now that you've sent data through Soracom Funnel, let's actually confirm that the data arrived in S3.
-
Open and sign in to the AWS S3 Console
-
Search for and click the S3 Bucket you created in Step 1
- Click the latest year, month, day, hour folders
- Click the newly created Object
- Click Download
- Open the file and confirm that the data you provided through Soracom Funnel is in the file
{"operatorId": "OP00XXXXXXXX", "timestamp": 1666961643739, "destination": {"provider": "aws", "service": "firehose", "resourceUrl": "https://firehose.ap-northeast-1.amazonaws.com/XXXXXXXX", "payloadsOnly": false}, "credentialsId": "XXXXXXXX", "payloads": {"temperature": 20}, "sourceProtocol": "tcp", "imsi": "440XXXXXXXXXXXX", "imei": "XXXXXXXXXXXXXXX"} {"operatorId": "OP00XXXXXXXX", "timestamp": 1666961643739, "destination": {"provider": "aws", "service": "firehose", "resourceUrl": "https://firehose.ap-northeast-1.amazonaws.com/XXXXXXXX", "payloadsOnly": false}, "credentialsId": "XXXXXXXX", "payloads": {"temperature": 20}, "sourceProtocol": "udp", "imsi": "440XXXXXXXXXXXX", "imei": "XXXXXXXXXXXXXXX"} {"operatorId": "OP00XXXXXXXX", "timestamp": 1666961643739, "destination": {"provider": "aws", "service": "firehose", "resourceUrl": "https://firehose.ap-northeast-1.amazonaws.com/XXXXXXXX", "payloadsOnly": false}, "credentialsId": "XXXXXXXX", "payloads": {"temperature": 20}, "sourceProtocol": "http", "imsi": "440XXXXXXXXXXXX", "imei": "XXXXXXXXXXXXXXX"}
You have successfully stored data in S3 through Soracom Funnel and Amazon Data Firehose.
References
AWS CloudFormation Resource Stack Details
Below are the details of the CloudFormation Resource Stack you created in Step 1.
| AWS Resource | Resource Name |
|---|---|
| Amazon Data Firehose | DeliveryStreamName from Step 1 |
| S3 Bucket | S3BucketName from Step 1 |
| IAM Role | IamRoleNameForFunnel from Step 1 |
| IAM Role | <DeliveryStreamName>-role |
| CloudWatch Logs Log Group | <DeliveryStreamName>-log-group |
| CloudWatch Logs Log Stream | <DeliveryStreamName>-log-stream |
Terminate Usage
When you want to stop using Funnel to store your data in S3, disable the Soracom Funnel service you enabled in Step 2, then simply delete the CloudFormation Resource Stack you made in Step 1.
- Navigate to the Amazon CloudFormation Resource Stack you created in Step 1
- Click Delete
The S3 bucket will not terminate even if you delete the Stack.
Visit the Amazon guide on Deleting a Bucket to delete the S3 Bucket resource.