


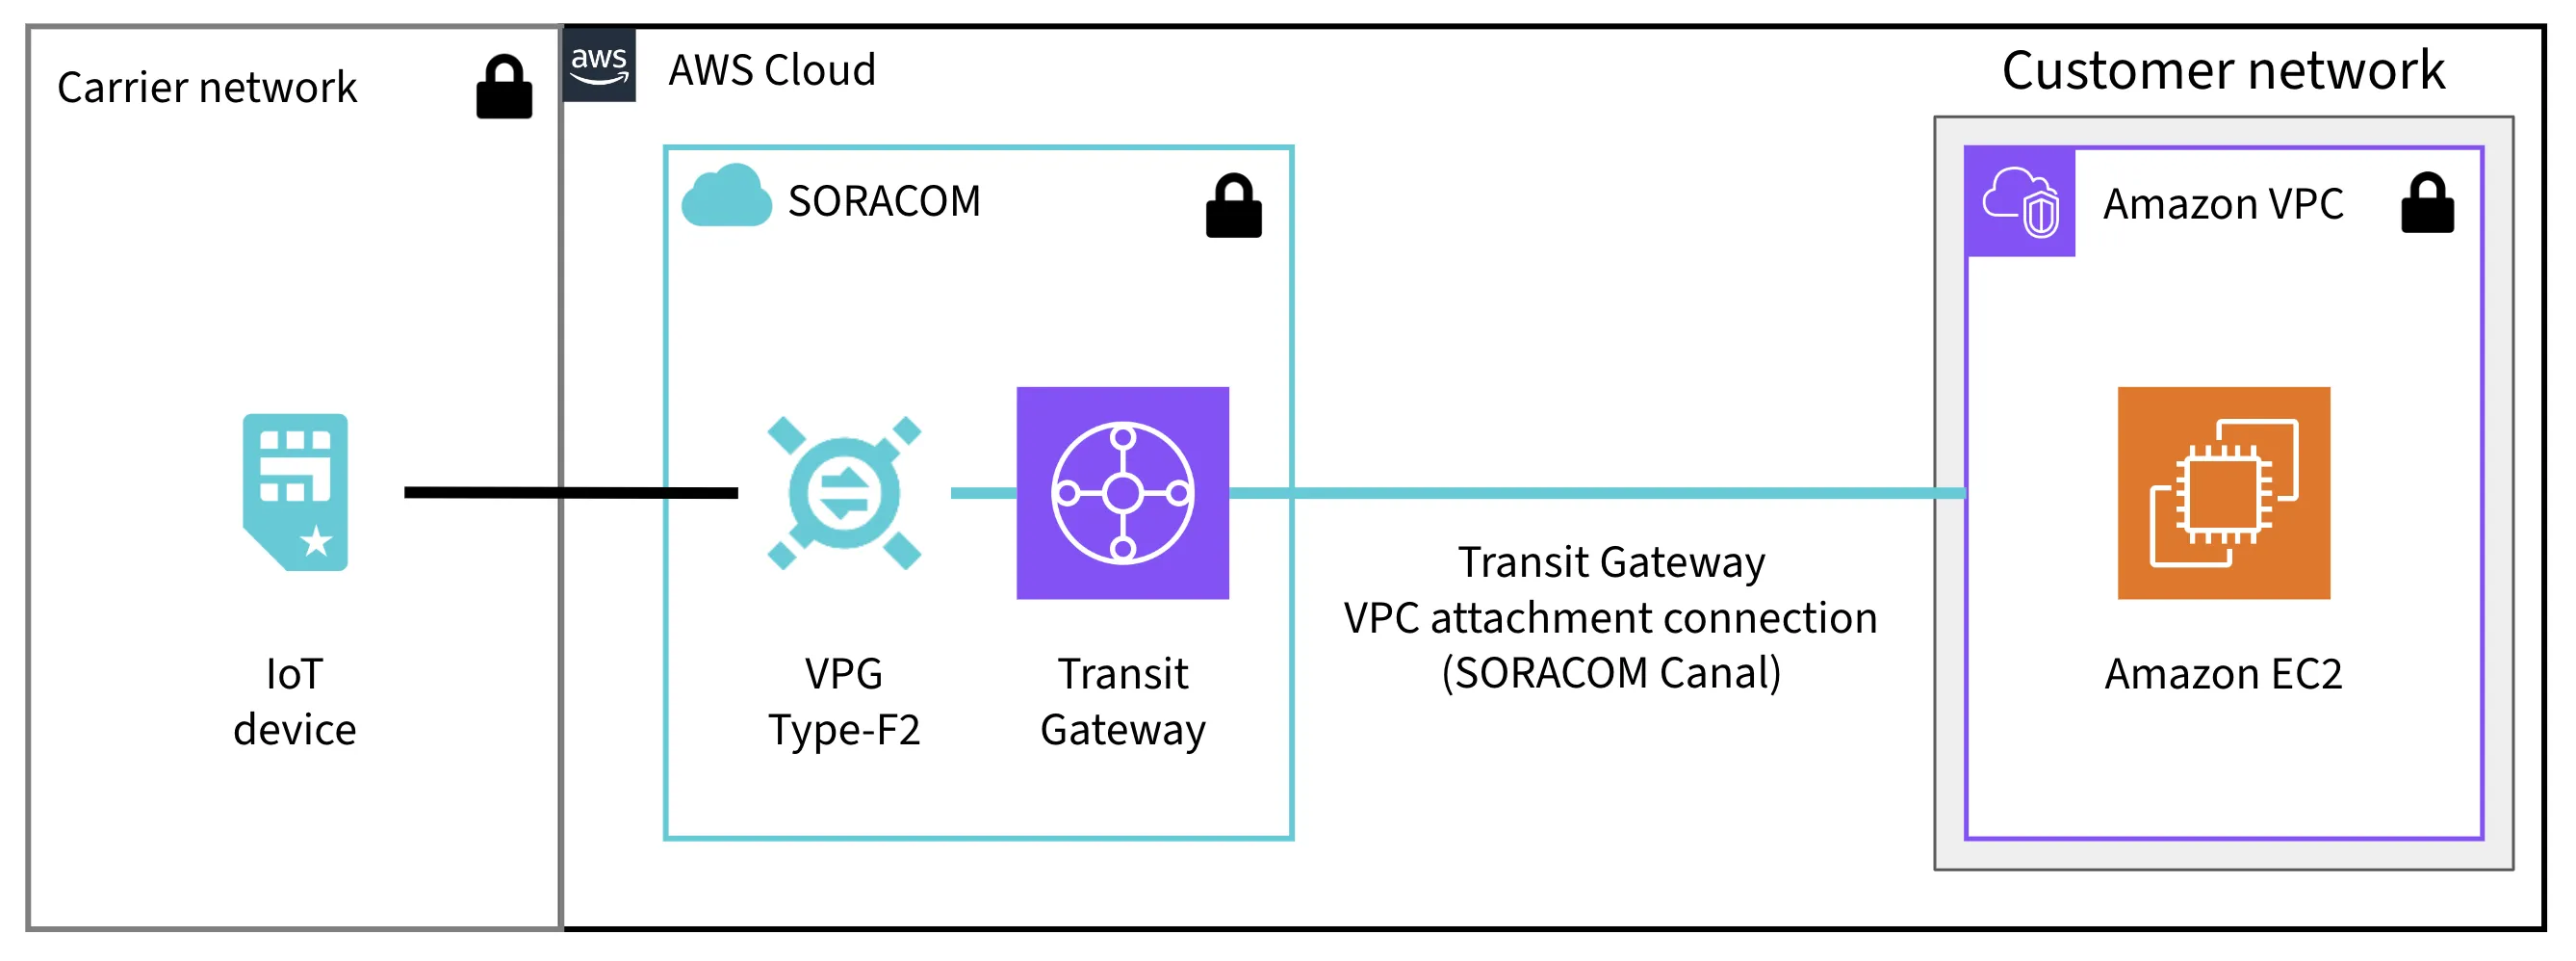
The Soracom Canal Transit Gateway VPC Attachment connects a Type-F2 VPG to your Amazon VPC. This connection enables bidirectional communication without NAT between devices using IoT SIMs and instances such as EC2 in your Amazon VPC over a private network.
Requirements
To configure Canal with a Transit Gateway VPC Attachment, you will need:
- An Amazon VPC located in the same AWS region as your VPG. See Supported AWS Regions for more detail.
- A Type-F2 VPG. If you haven't already created a VPG, follow the instructions in the Creating a VPG section of this document.
- AWS CLI .
Limitations
If you have created a VPG in Japan coverage, your VPC cannot include the 10.21.0.0/16 IP address range. If your AWS VPC uses a CIDR block that includes this range, you will need to create a new VPC with a CIDR block that does not include this range.
Configuration
Creating a VPG
Creating a VPG will incur fees. Refer to the Pricing & Fee Schedule for more information.
Follow the instructions from the Virtual Private Gateway Configuration documentation to create a new VPG with the following options:
- Type - Select
Type-F2(other VPG types do not support Transit Gateway VPC Attachment). - Use internet gateway - Select
ONif you have a requirement to communicate with the internet without sending data through the Transit Gateway. Otherwise, selectOFF. - Rendezvous Point - Select the rendezvous point in the same region as your Transit Gateway. If you do not see your region listed you will have to create a new Transit Gateway in one of the supported regions and peer to your current region in AWS. Soracom does not currently support inter-region attachment. For more details, see Supported AWS Regions.
- CIDR Range for device subnet (optional) - The CIDR block of IP addresses assigned to Air and Arc devices that connect to this VPG. If left blank, a default block of
10.128.0.0/9will be used. Manually specified Device Subnets must be within the10.0.0.0/8,172.16.0.0/12, or192.168.0.0/16CIDR ranges and have a subnet mask of/24or larger.
For more information on each option, refer to the Virtual Private Gateway Configuration documentation.
Creating a Transit Gateway VPC Attachment Connection
You need the following information about your Amazon VPC to create a Transit Gateway VPC Attachment connection.
- AWS Region: You can confirm by signing in to the AWS Management Console and checking the region displayed at the top right (e.g., Tokyo).
- AWS Account ID: You can confirm with following the AWS document: View AWS account identifiers .
- VPC ID: The ID of your VPC to attach. The ID begins with
vpc-. - Subnet IDs: The IDs of your subnets under the VPC above. You can specify one or more subnets but you can specify only one subnet per Availability Zone.
Here's the steps to create Transit Gateway VPC Attachment connection.
-
In the VPG settings page for the created VPG, click Closed Network > + Add Transit Gateway VPC Attachment Connection.
-
Configure the followings.
- AWS Account ID
- AWS VPC ID
- AWS Region
- Name (optional)
-
Click Add Connection.
The Transit Gateway VPC Attachment connection (Transit Gateway Attachment) will be created.
-
You can see the following procedures for the configuration in "VPC Attachment Settings" window. Replace the following parts of the AWS CLI commands displayed under Accept Resource Share Invitation and Create Transit Gateway VPC Attachment and execute them on your workstation.
<REPLACE_YOUR_AWS_PROFILE>: Replace with your AWS CLI profile.<REPLACE_YOUR_SUBNET_ID_A>,<REPLACE_YOUR_SUBNET_ID_B>: Replace with the IDs of the subnets where the VPC attachment will be created. You can specify one or more subnets but you can specify only one subnet per Availability Zone.
With the commands, the resource share of the Transit Gateway managed by Soracom will be accepted in your AWS account, and the following results will be displayed.
-
Accept Resource Share Invitation
{ "resourceShareInvitation": { "resourceShareInvitationArn": "arn:aws:ram:eu-central-1:000000000000:resource-share-invitation/xxxxxxxx-xxxx-xxxx-xxxx-xxxxxxxxxxxx", "resourceShareName": "OP0000000000-000000000000-xxxxxxxx-xxxx-xxxx-xxxx-xxxxxxxxxxxx", "resourceShareArn": "arn:aws:ram:eu-central-1:000000000000:resource-share/xxxxxxxx-xxxx-xxxx-xxxx-xxxxxxxxxxxx", "senderAccountId": "950858143650", "receiverAccountId": "000000000000", "invitationTimestamp": "2024-XX-XXTXX:XX:XX.000000+00:00", "status": "ACCEPTED" } } -
Create Transit Gateway VPC Attachment
{
    "TransitGatewayVpcAttachment": {
        "TransitGatewayAttachmentId": "tgw-attach-XXXXXXXXXXXXXXXXX",
        "TransitGatewayId": "tgw-XXXXXXXXXXXXXXXXX",
        "VpcId": "vpc-XXXXXXXXXXXXXXXXX",
        "VpcOwnerId": "000000000000",
        "State": "pendingAcceptance",
        "SubnetIds": [
            "subnet-aaaaaaaaaaaaaaaaa",
            "subnet-bbbbbbbbbbbbbbbbb"
        ],
        "CreationTime": "2024-XX-XXTXX:XX:XX+00:00",
        "Options": {
            "DnsSupport": "enable",
            "Ipv6Support": "disable",
            "ApplianceModeSupport": "disable"
        }
    }
}
Once you created a Transit Gateway VPC attachment, you can see the "VPC Attachment Settings" window again by clicking the Settings Icon next to Transit Gateway VPC Attachment Connections.
Configuring Routes
To enable bidirectional communication between the VPG and your Amazon VPC via the Transit Gateway VPC Attachment connection, the following routing settings are required:
Routing from Your Amazon VPC to the VPG
-
Access the VPC Dashboard , switch to your region, and in the side menu, click Your VPCs.
-
Select your Amazon VPC, and click the route table ID displayed under Main Route Table.
-
Select the route table, go to the Routes tab, and click Edit routes.
-
Click Add route.
-
Configure the following settings.
- Destination: Enter the CIDR block of the VPG's device subnet IP address range. You can see this in the VPG settings page as Device Subnet IP Address Range.
- Target: Select "Transit Gateway" and enter the Transit Gateway ID shared by Soracom. You can see the ID in the VPG settings page.
-
Click Save changes.
Routing from the VPG to Your Amazon VPC
-
In the VPG settings page, click Routing Table > + Add Static Route.
-
Configure the following settings.
- Destination Network: Enter the CIDR block of your Amazon VPC.
- Gateway: Select the attachment ID of the Transit Gateway VPC Attachment connection (Transit Gateway Attachment) created in Creating a Transit Gateway VPC Attachment Connection. The VPC attachment ID can be displayed in the VPG settings page by clicking Closed Network Settings and then selecting Transit Gateway VPC Attachment Connections.
-
Click Add.
Now the bidirectional communication between the VPG and your Amazon VPC is enabled.
(Reference) Terminating the Transit Gateway VPC Attachment Connection
When you need to delete the Transit Gateway VPC Attachment, take the following steps.
-
Delete the static routes from the VPG routing table.
-
In the VPG settings page, click Routing Table and click the Delete Icon next to the static route where the Transit Gateway VPC Attachment connection (Transit Gateway Attachment) is specified as the Gateway.
-
Confirm and click Delete.
-
If multiple static routes are set for the Transit Gateway VPC Attachment connection to be terminated, delete all of them.
-
-
Delete the Transit Gateway VPC Attachment connection (Transit Gateway Attachment).
-
In the VPG settings page, click Closed Network Settings and click the Delete Icon next to the Transit Gateway VPC Attachment connection (Transit Gateway Attachment) to be terminated.
-
Click Delete Connection.
-
Even if you delete the Transit Gateway VPC Attachment connection, the VPG usage fee will continue to be charged until the VPG is deleted. For more information about VPG usage fees, see Pricing & Fee Schedule. For details on terminating or deleting a VPG, see Terminating a VPG.
Be aware that you may also have to delete AWS resources such as EC2 to stop the charge if you do not need them.