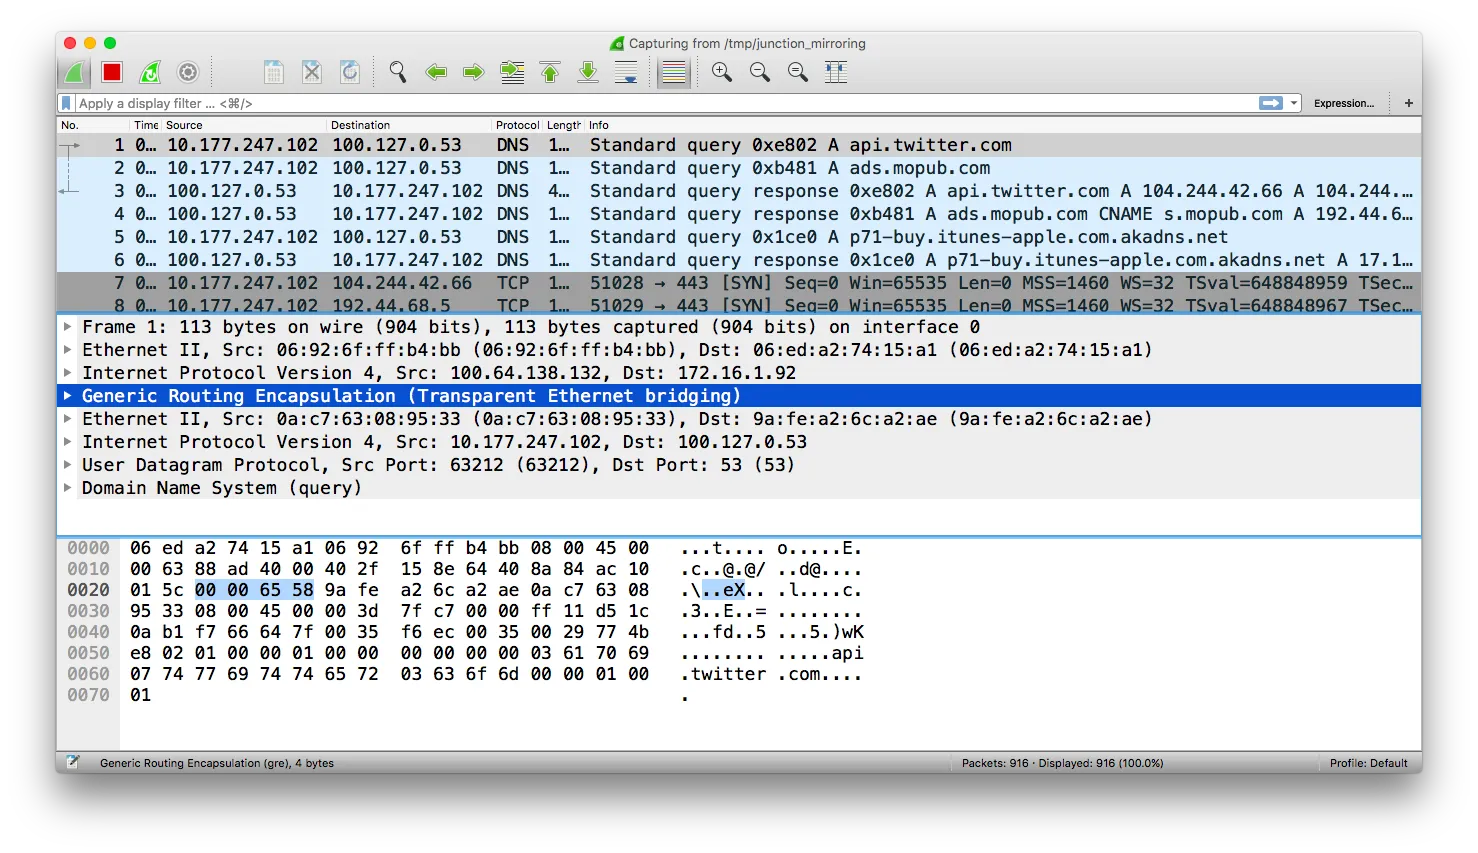
Junction's Mirroring mode will copy all packets passing through the VPG and forward the copy to one or more destinations. At the destination, you can then capture the packets in order to perform deep analysis or inspect packet payload.
Example Implementation
Junction's Mirroring destinations are specified by IP address. While you can specify any public IP address that can be accessed by the VPG, the VPG can also be configured with Soracom Canal, Direct, or Door, in order to provide private network connectivity. As each underlying networking configuration varies, implementation instructions will vary according to the Mirroring destination you want to use.
This guide will demonstrate packet mirroring from the VPG to an AWS EC2 instance, by using Soracom Canal and a VPC peering connection as the underlying network connection.
Requirements
- A Virtual Private Gateway
- An AWS account
- An AWS VPC
- Soracom Canal configured
- An AWS EC2 instance that will receive the mirrored packets
In this guide, we will use 172.16.0.0/16 as our AWS VPC CIDR block. When configuring Mirroring for your network, ensure that you use the CIDR block that corresponds to your private network.
Canal Setup
Before we can forward mirrored packets anywhere, we need to have a connection between our VPG and our private network. As we have an AWS VPC, we can establish the connection by using Soracom Canal, which will use an AWS Peering Connection to create the network connectivity.
Follow the Soracom Canal Configuration documentation to set up a Peering Connection from the VPG to your private network, ensuring that you have updated your VPC's route table to accept traffic from the VPG.
Additional VPC Configuration
In addition to the Canal setup, we also need to update our VPC to accept GRE (Generic Routing Encapsulation) traffic. This will be done by updating the Network ACL attached to our VPC.
-
Sign in to the AWS Management Console . From the Services menu, open the VPC dashboard.
-
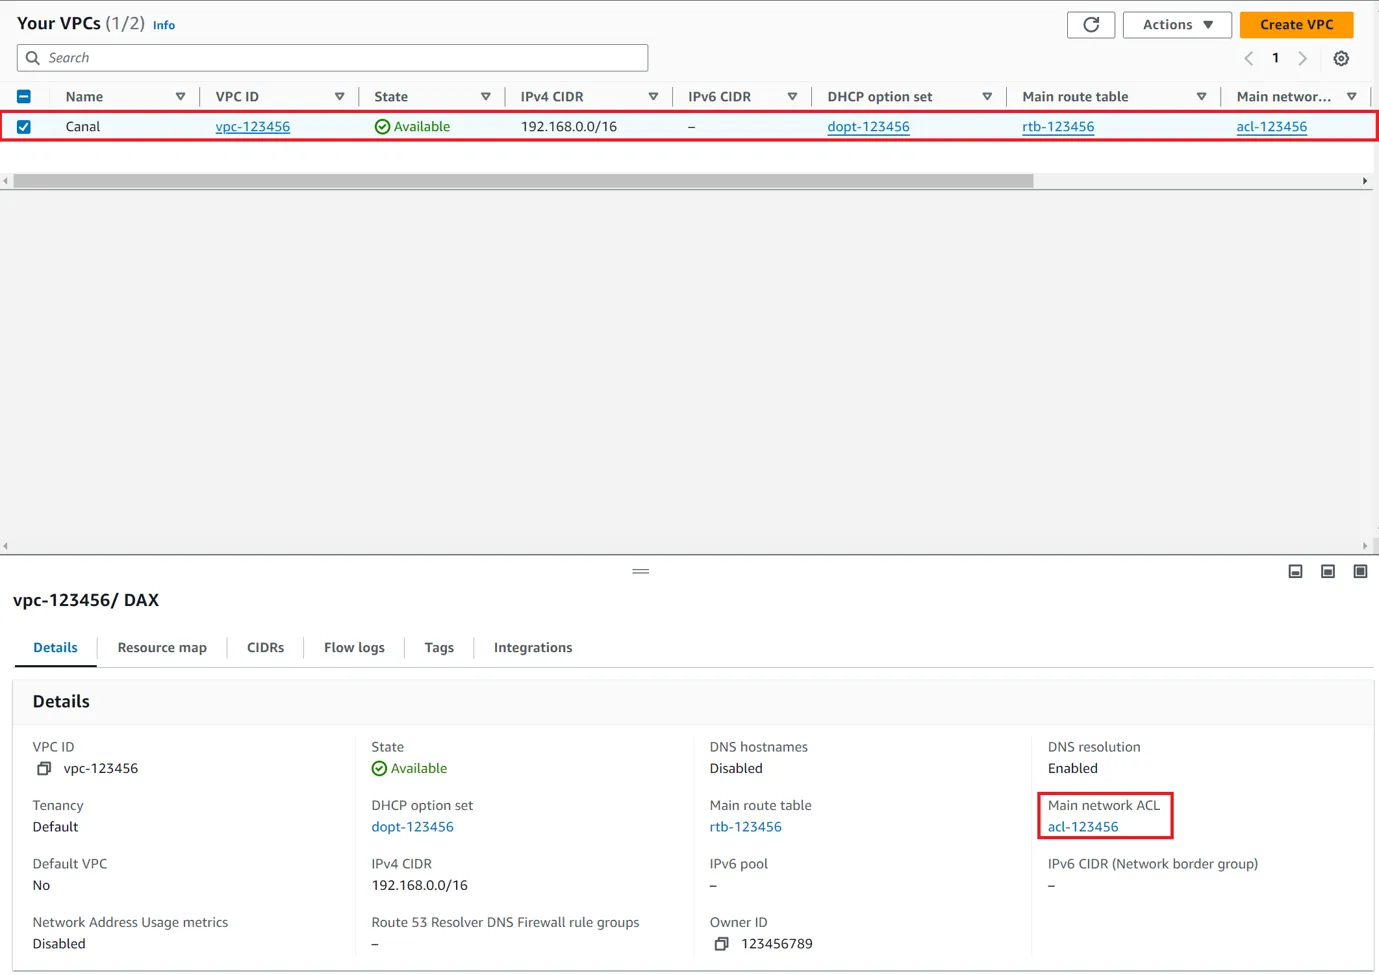
Click the Your VPCs section, then select the VPC which is connected with Soracom Canal. From the Description tab, find the Network ACL property, and click the acl-... item that is attached to the VPC.
-
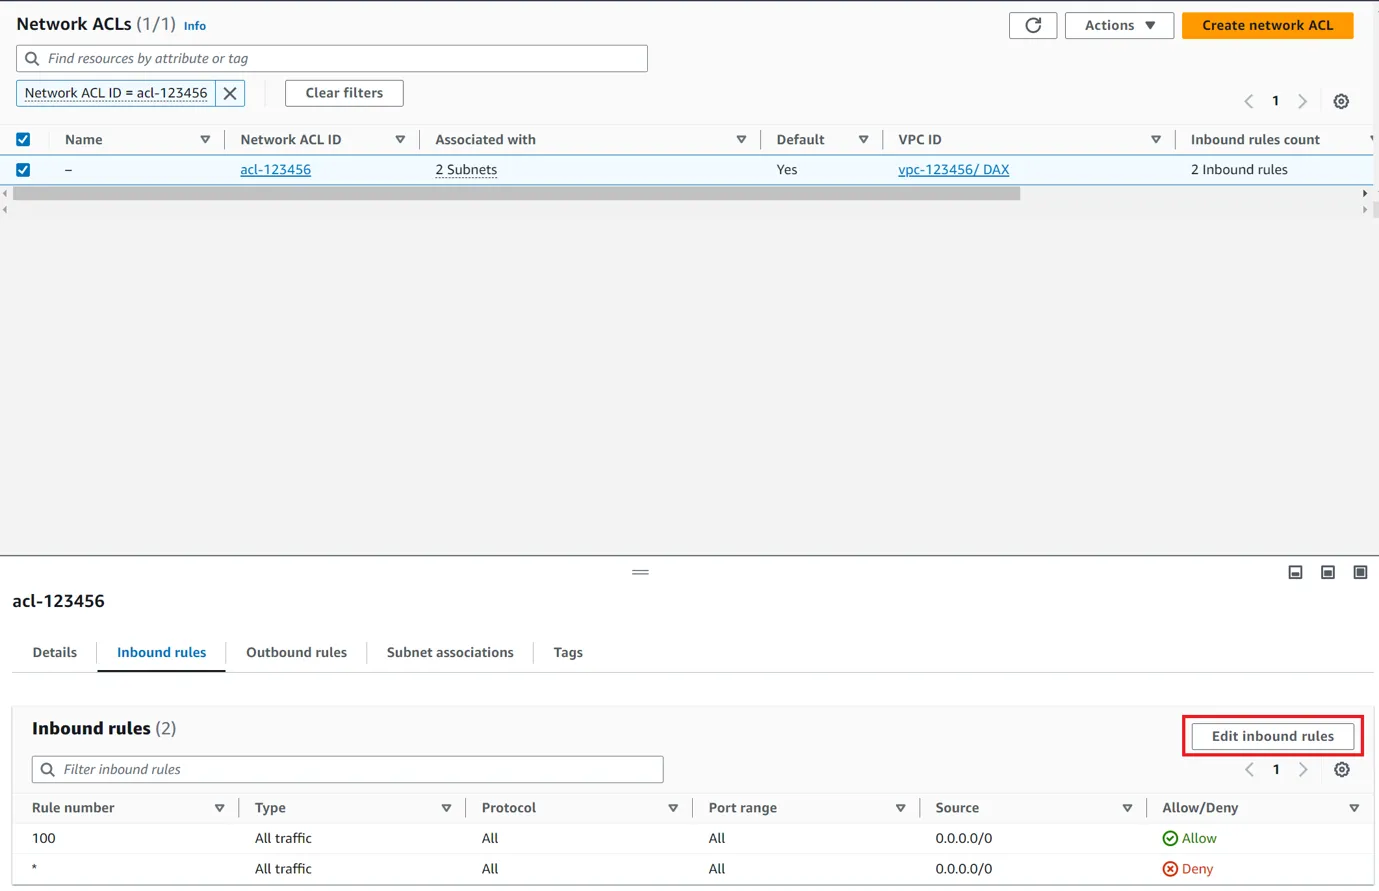
From the Network ACL screen, click the Inbound Rules tab. Then click the Edit inbound rules button.
-
Add a rule with the following properties:
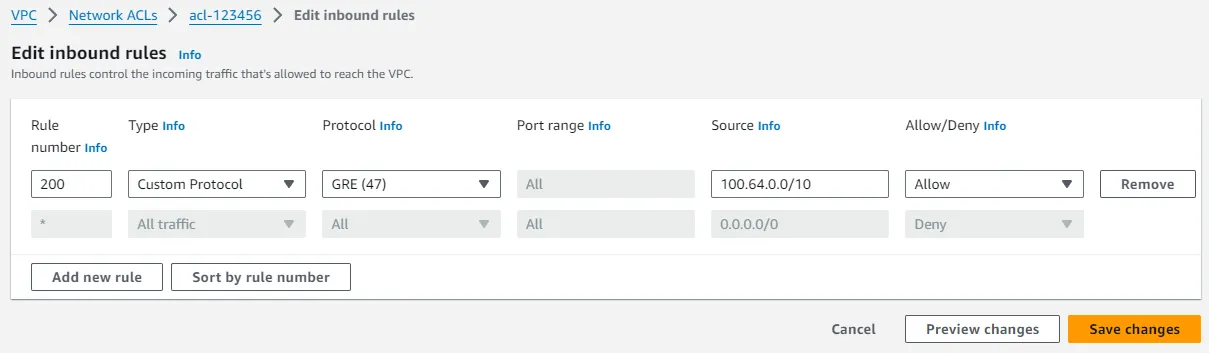
- Rule # -
200 - Type -
Custom Protocol Rule - Protocol -
GRE (47) - Port Range -
ALL - Source -
100.64.0.0/10 - Allow / Deny -
ALLOW
- Rule # -
-
Click the Save button.
EC2 Setup
We need an endpoint in our private network which will receive the mirrored packets. If you haven't already, launch a new EC2 instance, such as an Amazon Linux 2023 instance, ensuring that its Network configuration is set to use your VPC, and that its Network interfaces configuration is set with a static IP address within your VPC's CIDR block. This IP address will serve as the Mirroring destination.
We also need to configure the EC2 instance's security group to accept the incoming packets. Below, we will create a new security group, however you can also edit an existing security group with the same settings.
-
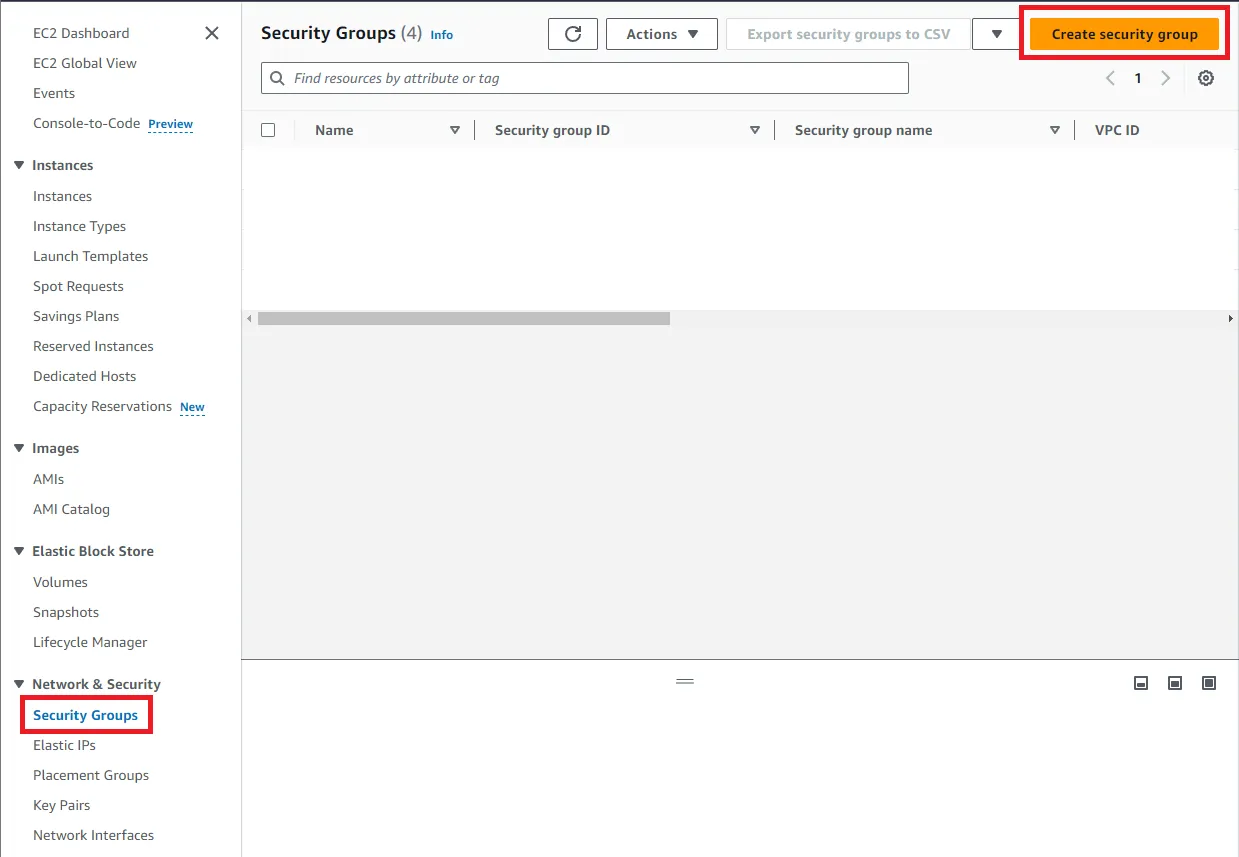
From the AWS Services menu, open the EC2 dashboard. Click the Security Groups section, then click the Create Security Group button.
-
Enter the configuration for the new security group:
- Security group name - A name that will identify this group, such as
junction-mirroring. - VPC - The VPC where the EC2 belongs.
- Security group rules - Add the following Inbound rules:
Type Protocol Port Source SSH TCP 22 Anywhere Custom Protocol GREall Custom: 100.64.0.0/10Then click the Create button.
- Security group name - A name that will identify this group, such as
-
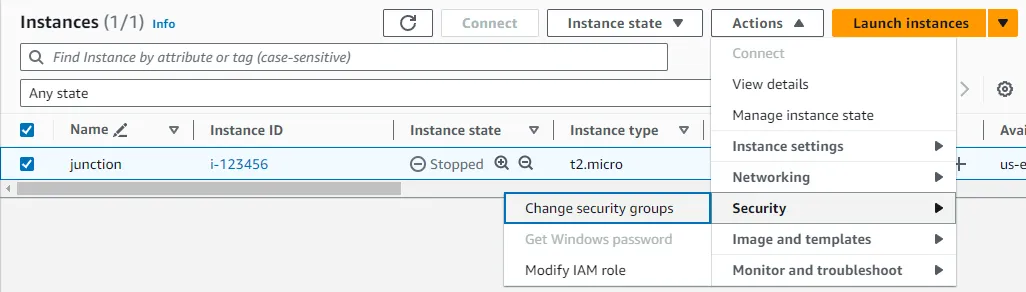
From the EC2 dashboard, click the Instances section, and select the EC2 instance that will be accepting the mirrored packets. Then click the Actions menu, and select Security Change Security Groups.
-
Select the security group that we just created, then click the Add Security Groups button. Then click Save.
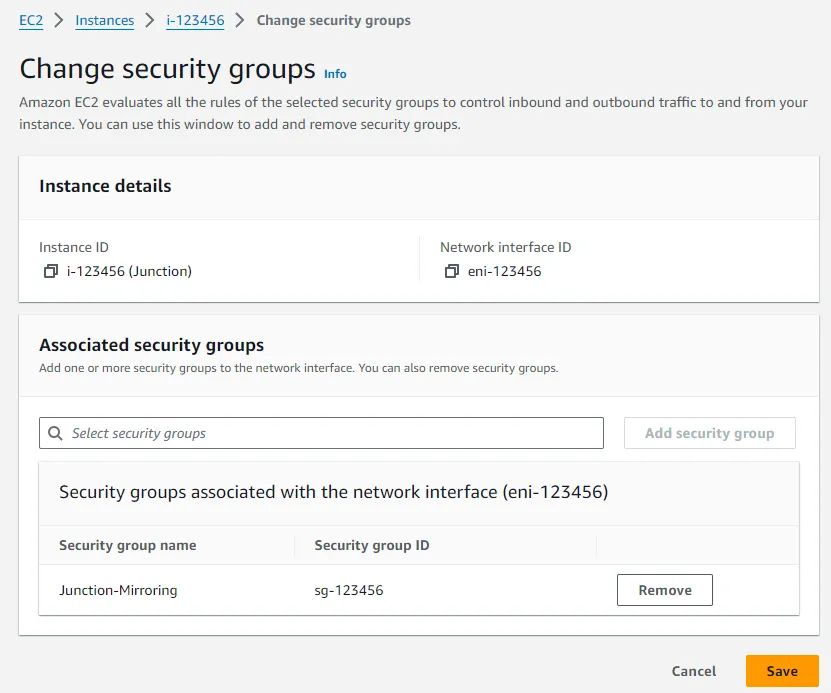
To confirm that our EC2 is ready to accept the mirrored packets, find the Security groups parameter within the Description tab. Then click the view inbound rules link. Among the list of rules, we should see a line that allows protocol GRE (47) traffic on All ports from source 100.64.0.0/10.
Configure Junction
So far, we've completed the following:
- Our Soracom VPG is connected to our AWS VPC using Soracom Canal
- Our AWS VPC Network ACL has been configured to allow GRE traffic from
100.64.0.0/10. - We have an EC2 with the appropriate security group configuration that will accept our mirrored packets.
Let's configure our VPG to send the mirrored packets to our EC2.
Follow the Mirroring configuration instructions from the Junction Configuration documentation, providing the following parameters:
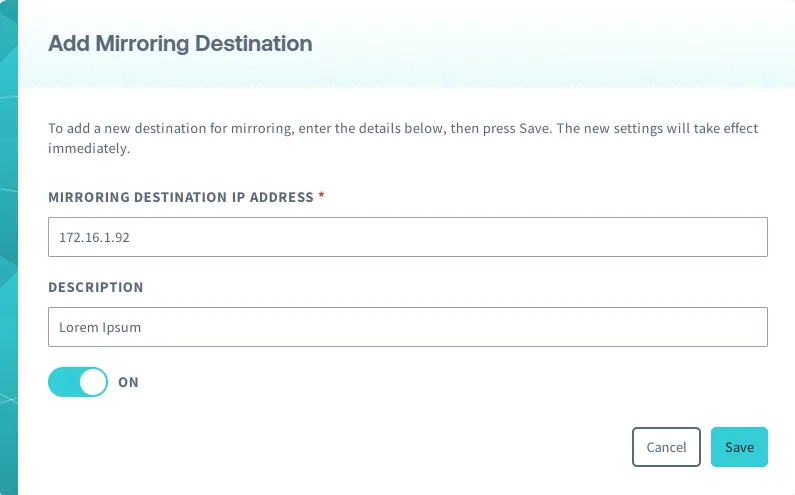
- Mirroring destination IP address - The static IP address of the EC2 instance.
- Description - An optional description to identify where mirrored packets are being sent.
- Status - ON.
Once we save these settings, Junction will immediately begin mirroring packets and forwarding them to our EC2.
If any IoT SIMs were not previously attached to the VPG, you must disconnect and reconnect their cellular connection in order to connect to the VPG.
Capturing Packets
With packets being mirrored and forwarded to our EC2, we can now begin capturing packets.
Connect to the EC2 using SSH. Then run tcpdump to start viewing the incoming packets. Depending on your EC2 image, you may need to install the tcpdump package first.
sudo tcpdump -vvv -i eth0 proto gre
>sudo: unable to resolve host ip-172-16-1-92
>tcpdump: listening on eth0, link-type EN10MB (Ethernet), capture size 262144 bytes
>07:47:37.040340 IP (tos 0x0, ttl 64, id 62738, offset 0, flags [DF], proto GRE (47), length 135)
>    100.64.138.132 > 172.16.1.92: GREv0, Flags [none], length 115
>    IP (tos 0x0, ttl 64, id 39209, offset 0, flags [DF], proto TCP (6), length 97)
>...
Inspecting Packets
Now that our EC2 instance is receiving the mirrored packets, we can start analyzing the packets with a tool like Wireshark.
Since the packets are arriving on the EC2 instance, we need a way to feed them into Wireshark on our local machine. Luckily, we can modify our SSH connection parameters slightly to automatically start tcpdump, and then pipe the terminal output directly to Wireshark.
Linux & Mac
-
On our local machine, first create a buffer called
junction_mirroring:mkfifo /tmp/junction_mirroring -
Next, run Wireshark, specifying our buffer as the input packet source:
wireshark -k -i /tmp/junction_mirroring & -
Then just connect to the EC2 instance using SSH, with a parameter to execute the
tcpdumpcommand, and then pipe the output directly to our local buffer:ssh -X -i "xxx-dev01.pem" ec2-user@<ec2-public-ip> "sudo /usr/sbin/tcpdump -s 0 -U -n -w - -i eth0 proto gre" > /tmp/junction_mirroring
Windows
On versions of Windows that do not have an SSH client, we can use Plink (PuTTY Link) to accomplish the same thing. Download the installer, or alternative download the plink.exe executable add its path to your Windows environment paths, so that you can run the plink command from any directory.
plink -i "xxx-dev01.pem" ec2-user@<ec2-public-ip> "sudo /usr/sbin/tcpdump -s 0 -U -n -w - -i eth0 proto gre" | "C:\Program Files\Wireshark\Wireshark.exe" -k -i -We are now feeding packet data directly from our EC2 instance into Wireshark, and can easily capture and analyze the packets.